Thursday 30 January 2014

Review: Bourjois 'Delice de Poudre' Bronzing Powder


So this guy is been sitting in my bronzers section for a really long time. I dodn't use it much not because its not good but I didn't want it to get over, lol! It smells like Chocolate!!!! The best thing ever.


The Bourjois Delice de Poudre Bronzing Powder comes in 2 shades; 51 and 52. I have Shade 51 which is a light orangey brown, its great for a pale - medium/light skin colour. But wont do anything to an Tan/Indian skin. The shade 52 is a little tiny bit darker, so it can work on Tan skin. It gives a really naturally bronzed look. It claims to have some sort of 'Sun Particles' like shimmer or something, but I didn't see that. It applies matte and slightly creamy on the skin.


Overall, this is a truly top-quality product and makeup artists like Lisa Eldridge use this powder and other powders from the range. There is no mirror and is perfumed, in case this bothers anyone - it doesn't bother me!

NOTE: I've seen many high end and some drugstore bronzers do this; It develops a thin and hard layer of oil like thing on the surface, there is no problem with it. I just think its because of the ingredient in them. This bronzer also does the same. You can get rid of it easily by a new piece of clear packing tape, then press it down over the full surface of the product and peel it slowly off.


If you don't wanna keep it in the case, if you don't like cute packaging (-_-) then its easily de-potable.

You can get your hands on this guy at any Bourjois counter in VaVaVoom, Faces, Sephora, Boots, Centre Point, etc. It retails for KD7 and is available in 2 shades (in Kuwait)


This is how it looks on the skin

Thanks for reading guys! *Wireless Hugs!*

Wednesday 29 January 2014

Valentines Day Special - Natural Looking Date Makeup Tutorial

First Date? Make am impression with your natural beauty, but enhancing it a little bit..using Makeup ofcourse :) Continue below to know how you can look Naturally Sultry in just 6 easy steps!

Check out my previous post HERE how you shouldn't wear makeup on the day!

I used The Balm Cosmetics 'Nude'tude' Palette to create this look, you don't have to have the same palette of-course, just use similar shades.


The Balm 'Nude'tude' Palette


Prime your lids, do your brows, do your foundation and all that normally the way you do it.
  1. Apply the colour 'Stubborn' (Light dusty rose pink) very lightly all over your lid only to even out the lid colour.
  2. Lightly highlight your Inner corners and browbone using the shade 'Stand-offish' (Shimmery Rose Gold-Pink, my fav in the palette!) - This step is important as it will bring awakeness to your eyes.
  3. Using the colour 'Sultry' and 'Seductive' (Matte light Brown and Frosty light Brown) with a blending brush, sweep it in your crease lightly. (Make sure no harsh edges is left out). Using the same colours, sweep it on your lower lashline as well.
  4. Take the colour 'Serious' (Matte Black) or 'Sleek' (Matte Dark Chocolate Brown) on an angled eyeliner brush and draw a little winged eyeliner on your upperlashline. Then take your pencil brush/smudge brush and Smudge the dark shadow outwards creating a little wing effect. (Check Picture 4, see how it gives a Sultry and Romantic look to your eyes on an instant!)
  5. Lastly, Apply a clump-free volumising Mascara and line your Waterline with the same black eyeshadow or use a pencil liner - This will Pull in the Whole look.

For the Lips I don't recommend using any Lipstick/Lipgloss, Try to keep it Kiss-Friendly by applying a Lip stain or Tinted Lip Balm. I used the Maybelline Baby Lips in Pink Punch.


So here is the Final Look!


HOPE THIS WILL BE HELPFUL FOR YOU GIRLS OUT THERE! <3
xoxo ~ Keep Commenting! I love replying you guys back!

Tuesday 28 January 2014

How Not to Wear Makeup on Valentines Day / Date Night

A lot of ideas are out there on Valentines day inspired makeup/outfit etc. on how you can/should do it. Well I'm going to show you how you shouldn't do it and scare the hell out of your date.

Valentines day reminds me of Red and Pink roses, softness, a little bit of flirt-ness, romantic weather, etc. So obviously you should also look something in comparison to the season and feelings. You want to look as natural as possible or use makeup tricks to enhance your beauty!

Below are the "quotes" you don't want your date saying, enjoy!


Did you just have a Sun Bath?


Bronzing your features out is totally cool I know, if done the right way for the right occasion. You're not going to a Kim Kardashian look alike competition, so chill. Neither you wanna look like a burnt mess, just came out of a Coal mine. Your date wont enjoy the whole look of it, unless he's a hardcore fan of Snooki! Well actually you don't need at all to use bronzer in this sweet cozy season. Unless you are as pale as a vampire then a little just on the outer parts of your face and hollows of your cheeks won't hurt :)


Am I in the 80's ?!


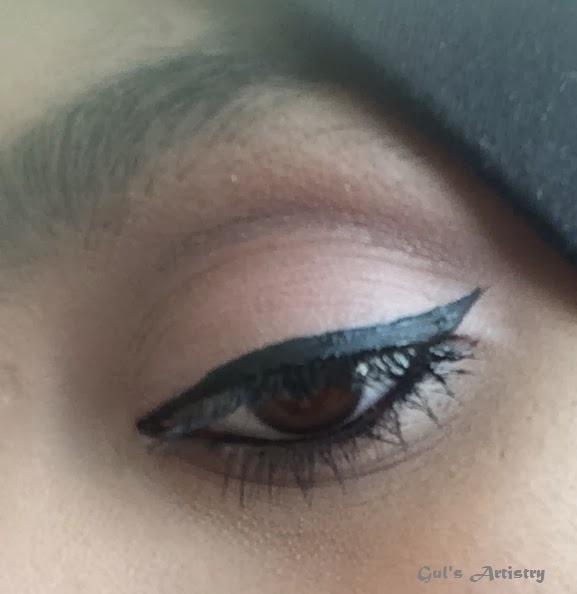
This is just an amazing work! But don't you think it isn't right for Valentines day?
You can get all creative and colourful rest of the days in the year, Halloween maybe? But on V'day you just wanna keep those neons, bold colours and even black (if you don't know how to handle black eyeshadow) aside. Your date is expecting his dream girl like an Angel, not a drag queen. You can rock very subtle colours like pink, frosty, shimmery (not glitter, please!), pale white, nude, etc. These colours will bring a softness to your eyes and make them look very innocent and romantic at the same time.


Oh those Brows!

NO!
Noooooooo!

I know the whole tattoo'ed brow look is totally inn in the Gulf atm, but really? do you really think that looks romantic and sweet? I don't think so at all.. How about a more natural looking brows, it wont hurt. Make them as soft looking as possible. Your date should be concentrating on you, not those brows! Never use a black pencil to fill them in, please..do a favour to the people around you.


You Blush so Hard, OMG!


Blusher looks like a really small deal, but it surely does make a difference. When I started doing making makeup, I never applied blusher because I thought it made me look like a clown! Well yes, if you don't do it the right way it would end up looking like a clown. You wanna go really light with this step, maybe a peach, soft pink or a dusty rose colour would really complement the naturally blushing look. The same goes with the highlight, skip it! There is no need of a strong highlight on a date.


Dayyyymmm...Those Lashes!


Huge Fluttery Dramatic Lashes? a big NO NO! Keep it natural my ladies... This dramatic eyelashes look is great for a photo-shoot or drag event, but its your date, so keep it old school. Just swipe on a nice volumizing, clump-free Mascara after curling your lashes using an Eyelash curler will do a great job keeping it romantic and sultry!


I so wanna Kiss you right now, NOT!


Girls...this is where you want to keep it the most natural look. Its a date remember? not to show that you own every shade of a Lime Crime Lipstick (No Offence, I love Lime Crime Lipstick shades! just not for V'day.) You want them to look Kiss'able and soft. Try to go for a colour that matches your natural lip colour, you can use gloss but make sure its not sticky.

So Finally, Please don't end up looking like this!


HOPE YOU ENJOYED READING THIS, YES I HAVE VERY FUN POSTS COMING IN THE FUTURE;
GIFT IDEAS FOR V'DAY, 14 DAYS OF V'DAY SURPRISES, MAKE-UP LOOKS INSPIRED BY V'DAY AND MORE! KEEP AN EYE xx

Thanks for tuning in *Wireless Hugs*

Sunday 26 January 2014

Review: MUA Cosmetics New 'Matte Perfect Primer' (My current Fav Face Primer!)

Have you guys heard about MUA Cosmetics? If no then you need to check them out ASAP HERE! I'm deeply in love with their products <3 Its so affordable and the most awesome quality for the price. I own a lot of stuff from MUA. I've been using their 'Matte Perfect' Face primer for a couple of months now and absolutely love it.


Before discovering the MAtte Perfect, I only and only used the Benefit 'Porefessional' which retails for KD11 *sob!* I love the feel of the Porefessional and it really does minimize your pores. Worth the Hype! I always recommend the Porefessional to my Clients and Students with Oily/Combination skin, it does wonders!


But ofcourse not all of us would spend KD11 for a primer, guess what? MUA Cosmetics 'Matte Perfect' is the Dupe! Yaaaayy! ^^ and it retails for only 4GBP (1.85KD)!!!

As I said, I've been using it for a while now, and wanted to check it out in all aspects that its the dupe and works exactly similar to Porefessional. Well surprisingly it does, I used the Matte Perfect on one side of my face and the Porefessional on the other. End of the day, they both worked just the same!


The consistency of Matte Perfect is similar to the Porefessional; light beige colour and Translucent application. Its really soft and silky to feel too (Which I love). It keeps you oil free for the entire day and gives your foundation an excellent base to stick on to. The blendability is also very easy and works on every skin tone. People with dry skin can also use it over the moisturiser as Foundation base for long lasting finish.

Left side is 'Porefessional' and Right side is 'Matte Perfect'
The Matte Perfect blends out totally translucent so don't you worry people!
You can purchase the product HERE and yes they ship internationally with very limited shipping charge! Keep an eye on their social media networks for deals and promos (they have Free Shipping codes regularly!).

HOPE THIS WAS HELPFUL, THANKS FOR READING! xx
For business inquiries, gulsartistry@gmail.com

Show some love, Comment below and tell me how you liked the review. Any requests acceptable!

Wednesday 22 January 2014

Mascara Guide: My Fav brand for Mascara Purchase!


I guess every Mascara commercial or packaging has that model with extremely huge eyelashes, appealing and wanting you to purchase it. Let's get real, we know that's not gonna happen in person. I compiled a list of Mascaras worth buying and do their job right (Ofcourse the ones I've tried).

My favourite brand in Mascara, no doubt, is 'Bourjois'. Boujois is known for the best Volumizing Mascaras and it really has the best ones, all of them have amazing brush (applicator) and formula. My very first purchase of Mascara from Bourjois was the 'Volume Glamour Max Definition Mascara' which is a bomb! Since then I've been trying out different ones from them. I don't mean to say that other brands Mascara is not good, but I've not come across any which truly does what it says on the packaging. Below I've categorised the Mascara's based on their application and coverage type.

NOTE: Always use an Eyelash Curler before applying Mascara for better results :)

Natural Look - 

Bourjois Liner Effect Mascara -
A very interesting looking brush, awesome bottom lashes application with the smaller bristles side and a very natural finish with one coat - you can build up the product with more coats!
Bourjois Queen Attitude Mascara -
This was in the 'Queen Attitude' Collection - a natural Volume Mascara with side-swept application - amazing results with a couple of coats.

Volumized Look -

Bourjois Volume Glamour Ultra Care Mascara (Noir Black) -
This is the Mascara if you want an Ultra Black semi Volumized look, very nice pigmentation and coverage.
Bourjois Volume Glamour -
I will say this is that Mascara which looks pretty basic and has the basic application wand, but its formula makes your lashes some sexy definition. I recently purchased this Mascara and loving it for daily use. I've also featured this in my LashExtender post, check it out HERE.
Bourjois Volume Glamour MAX
This guy is my fav fav fav! The bestest of them all Mascaras! The Volumizing capabilities of this stuff is just awesome! The drama it creates is Ah-maziiinnggggg....check it out if you want some False Lash Effect guys!

Lengthened Look - 

Bourjois Volume Glamour Ultra Curl -
Well you can make out from the interesting curled brush that it curls your lashes upwards, which infact pushes your lashes behind giving them a nice length. I love to use this after applying falsies as it blends my natural lashes with Falsies easily.

Bourjois Volume Glamour Max Definition -
This is my fav for everyday use, awesome coverage and length without too much drama with a single coat

Volume + Length - 

Bourjois Volumizer -
This thing works like magic! I like the whole concept of 2 step application. If you do the step one only, you get good length and if you do step2, then..Bam!! Volumized!
Bourjois Twist Up Volume Mascara - 
Another intersring Mascara Wand by which I was so fascinated! I really love the Wand and the Formula of this Mascara - Apply with straight mascara for Length and Twist it up for a Volumized look ^^ How amazing is that!


So this was my shot on my fav Mascara in town, you can purchase any of these from VaVaVoom, Sephora, Faces, Boots, Centre Point, etc. Everyone has a Bourjois stall. All of these Mascaras ranges from 4-6KD.

One again Thanks for reading guys! *Wireless Hugs!*

For Business Inquiries - gulsartistry@gmail.com

Monday 20 January 2014

How To: Perfect Winged Eyeliner!

Me trying to pose for a perfect liner shot, but my big bulgy eyes don't make a clear front or down shot :P

Well I always get asked about my winged eyeliner; how I do it? Why cant we do it? etc. If you have same questions then this post might help you in creating [or faking one ;)] the perfect winged/cat eyeliner. 


You need:
A thin Brush Liquid Eyeliner (for beginners: Thin brush  and Liquid liners recommended, not Gel, for better precession and handling) I'm using here Lakme Eyeliner, the basic one
Cosmetic Cotton Swab
Moisturiser or Makeup Remover and your Eyes ofcourse :)

Step 1 - Prime your lids, do your shadow work, etc. etc.

Step 2 - Draw a thin line at the outer corner of your eyes, keeping your lower lashline as a guideline as if you are extending it upwards. You can keep this line longer or shorter depending on how much you want your wing to extend.

This is what it should look like when you open your eyes :)

Step 3 - Start lining your upper lashline starting from the centre of your eyelids and join in at the outer corners to the line we created earlier.

Step 4 - Now bulge your eyes outwards and with a stiff hand, strike small line in the inner lashline to join in the middle on top (Beginners, this is the reason you should start of with a thin brush eyeliner)

Step 5 - Now remember the first line we created, touching that line create another line joining the upper lashline

Step 6 - Fill in the gap with the eyeliner and Ta-daaaa! you're done :)
If you have made any mistakes or your line didn't come straight, thank goodness for the existence of Cotton swabs and makeup remover! Just pick up some makeup remover on your cotton swab and swipe off to create a line straight :)

I Hope this was helpful for some of you guys out there struggling to make winged eyeliners. Sorry for the crappy picture quality, I'm still waiting for my DSSLR Camera to arrive :'( 

Thanks for Reading guys *Wireless Hugs* :*
Comment below for any further information, I would be glad to answer!

****Don't forget to checkout my other social media networks****

Sunday 19 January 2014

Review: Bourjois Colour Edition 24H Eyeshadow - EXCLUSIVE CREAM-TO-POWDER FORMULA

I love layering my eye-shadows on cream bases as it intensifies the colours and makes them look as it is in the pot! Weather it be translucent or colour bases, it really helps your eye-shadow to last longer.

I came across the Bourjois Color Edition 24H Eyeshadow during my very first visit in 2014 to Va Va Voom, Marina Mall. It was launched in November 2013 but obviously Kuwait gets it late -_- Anyway, These are available in 6 shades totally; 
  • Kaki cheri (dark moss green)
  • Prune Nocturne (Magenta)
  • Bleu Tenebreux (Navy Blue)
  • Merveille d'argent (Silver)
  • Petale de glace (Nude pink)
  • Or Desir (Bronzy Gold)


Nobody would remember all these mouthful names unless you understand French! I would normally pick up and satisfy my addiction to everything in Blue..but....huh..I controlled myself and took the Petale de glace (Nude Pink). It was a good choice as its the lightest shade in the collection and can be layered on with almost any eyeshadow colour. All the shades have a nice shimmery-metallic finish to them making them Duo-chrome, I like that. These make a really good affordable base collection. 


This is what the description on their website says:

"A new generation cream-to-powder formula is the newest member of the Bourjois' Eyeshadow family! Fine and silky, this soft cream colour turns into powder upon the contact with the skin leaving you with a luxurious, second-skin feel. In just one sweep Colour Edition gives a metallic sheen and intense colour that last 24 hours"

Petale de glace - Swatch and Pigmentation
I must say, the cream-to-powder feel of the product is awesome and it applies like a dream! I have worn it individually as a single shade all over my lid and also layered with eyeshadows. Both ways, it worked very well. It stays put without creasing if you use an eyeshadow primer. I obviously didn't wear it for 24H, but for a good 12H and it lasted quite well. The colour didn't fade off or looked oily. You can apply the product with bare fingers or use a stiff concealer brush too, I prefer using my fingers as its easier to blend in.
Wearing the Bourjois Colour Edition 24H Individually, I paired it with bold Eyeliner look with some Mascara!
If you are looking for a good eyeshadow base, then this is your baby! You can get it from any Bourjois counters at Boots, VaVaVoom, Sephora, Centre Point or Faces branches all over Kuwait. I got mine from VaVaVoom Marina for KD4.

Thanks for reading! Comment below if you need to know something else :) I will be glad to reply! 
For Business Inquiries, please email me at gulsartistry@gmail.com

Check me out on other Social Media: